


I want to show how I did it
So ,

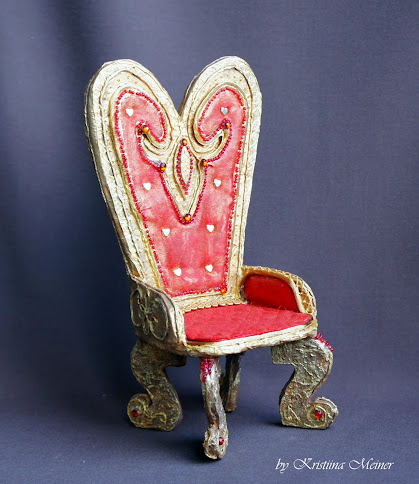
First of all you should design it. I came up with such a chair, which can be a throne as well.

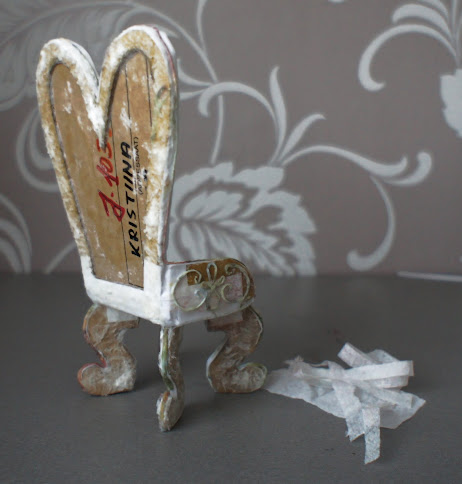
Cut out chair’s parts out of corrugated cardboard There should be 8 legs.A thicker cardboard should be used for the legs and major part of the chair.

Let’s assemble the chair. Glue legs pairwise and set in place. Cut paper strips and glue them to cover all side cuts of cardboard.

Plaster all seams with napkins for alignment.

To make the legs thicker, I plastered them with napkins as well.
I plastered with napkins the edges of the backside to give thickness and volume. I posted (made) a drawing on the armrests’s sides.

Painted it.

This is how the painted but not yet finished drawing of the armrest looks like.

Then I added soft :) thickness with wadding on the inside of armrestd.

Covered the back, seat and inside of the armrest with a piece of cloth.

Using awl I added some decoration “nails” – do not know the word for them but they go through and should be fixed from the other side.

Аnd on the back side I hided them with a cloth.

I decorated the legs with a golden 3D contour.

Sewed a pillow for the seat, it’s neither decorated nor fixed yet.
And so it is left to finish decorating and voila:


3 комментария:
очень здорово!!!!
так здорово!!!
Victory-Art , спасибо большое :)
Отправить комментарий